
本教学为翻译教学,转载请注明来自aboutcg.net,以及注明翻译者
原教学出自http://www.3dtotal.com/team/Tutorial…c_glass_01.php
Web: http://www.andrewklein.net
Email: andrew@andrewklein.net
翻译:wkkw(第一次翻译教学,感觉很多地方很不到位,希望各位见谅啊。。。)

Software Used: Maya & Mental Ray
使用软件:maya和mental ray
——————————————————————————–
For this demo we will utilize Maya’s Blinn material, Ramp texture, and Sampler Info utility. We will also use Mental Ray’s Dielectric Material and new Mia_material. The user of this tutorial should note that I have also used Mental Ray as my renderer, with Final Gathering, Global Illumination, Caustics, and Image Based lighting used for optimal realism.
在这次演示中,我们将利用maya的布林材质,渐变纹理和采样信息节点。同时我们也要使用mentalray的 电介质材质和新的mia_material。本教程的用户应注意到我还使用了mentalray作为我的渲染器,同时为了得到真实的效果还打开了 “final gathering”、“Global Illumination”、“caustics”。
Creating Glass with a Blinn:
使用布林创建玻璃:
——————————————————————————–
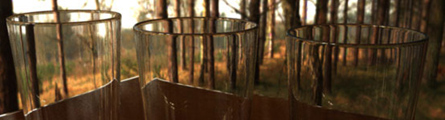
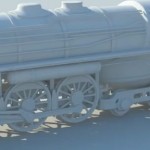
Our first step is to create the geometry for the glasses. Whilst simple, we need to make sure that the revolved surface (constructed here using a NURBS) is thicker at the base (just like a real pint glass). See Fig.01.
我们的第一步就是创建玻璃杯几何体。虽然很简单,但是我们需要保证建立的曲面(这里使用的nurbs创建的)的底部是比较厚的(就像一个真实的玻璃杯)。见下图一。

Next, I duplicate out a few of these, and set up the scene. My render settings are listed here as well (Fig.02 – 03).
下一步,我复制了几个,然后设定好场景。我的渲染设置列出如下图所示。


Understanding What Goes into Glass:
理解玻璃包含哪些内容:
——————————————————————————–
There are several components which need to be created. The first thing to note is that, of course, glass is a transparent entity. While this is the most obvious, we cannot overlook the subtleties inherent in this transparency due to the thickness of the surface as perceived. Second, glass is reflective, but again we must examine how this reflectivity works. It is a specularized surface, and thusly not very diffuse in terms of surface properties. Finally, glass is a refractive surface, bending light as it enters this medium which is denser than the air around it. Let’s break these elements down for a closer look:
Transparency – As mentioned, glass is transparent. But let’s examine what happens to our material as it gets close to the edge … It gets thicker. At the edges of the glass we are actually looking through a denser amount of material. Think about it this way: when a space shuttle exits the atmosphere by flying straight up (off the perpendicular normal of the Earth) it only goes through 62 miles of air to reach outer space. Conversely, if you were standing on the top of Mount Everest and could look both north and south from the summit, you might be able to see 150 miles in each direction (a total of 300 miles) before the Earth curves away and you are looking into space. When we look at the edge of the glass, the same thing is true, therefore we are looking at more “object” and should treat these edges as less transparent (Fig.04).
这里有几个部分需要我们去实现。首先要注意的是,当然,玻璃是一种透明的实体。虽然这是最明显的,但是我们不能 忽略玻璃底部厚度产生的微妙的透明度变化。第二,玻璃的反射,这样我们又得研究它的反射率是如何的,它的表面是镜面反射的,因此没有太多的漫反射在其上。 最后,玻璃是一个折射表面。它比空气的密度更高使得它能弯曲光线。让我们脱离这些因素来细看:
透明度-如前所述,玻璃是透明的。但是当我们越靠近物体的边缘时它就越显得厚了。在玻璃的这些边缘实际上我们看到的是一个密度很高的材质。让我们这么想: 当航天飞机脱离大气层直线上升时,只要通过62公里就能到达外层空间。相反,如果你站在珠穆朗玛峰的峰顶,并同时能看到南方和北方,你可能要看到两个方向 的150英里以外(总共300英里)才能看到大气层外围。当我们观察玻璃边缘时,事情是一样的,我们其实看到了更多的“物体”,自然边缘的透明度就更低一 些。

Reflectivity – Applying the same principle as before, that things are going to act oddly at the edge of our glass, we next throw into the mix the Fresnel Effect. When you look down at a reflective surface, the amount of reflection is determined by the viewing angle. If you were to look straight down into a pool of water, you would be able to see through the minimal reflectivity of the surface to the elements in the water below. At a more even angle, looking across the water, you are more likely to see reflection of the sky above, and not what is underneath. So, when texturing our reflectivity, we will also have to examine these edge effects to make our glass more reflective at glancing normals, and less reflective at normals which point directly towards the camera.
Specularity (vs. Diffuse) – We must also observe where on the spectrum for Diffuse to Reflective our glass needs to be. For the most part, since it is a dense, hard object, we will need to give it a low diffuse value and a higher specular value. We can then control glossiness depending on the purity of the glass, or whether or not the glass is “frosted”.
Refractivity – Finally, since our glass is a denser medium than the surrounding air, we will need to compute the index of refraction value. A chart is listed for your convenience in Fig.05. We can quickly see that Glass’s IOR value is 1.52 (or really any value between 1.5 and 1.55). As seen in Fig.06 – 07, when a beam of light enters a denser medium, it bends towards the normal of that surface, changing the perceived shape of objects inside or behind. The famous example can be seen on the left, this is called the “stick in the pond” example, theorized first by Socrates. The straw is not really bent, but the fact that we see it through a glass, with water inside that glass, means that light is bending twice between the straw and the eye. This concept has a name: Dielectrics (hence the specialized Dielectric shader that we will use soon).
反射-应用与以前一样的原则,在玻璃杯的边缘总会变的很古怪,接下来我们了解一下菲涅耳效应。当你观察一个反射 物体时,它的反射数量取决于你的视角。如果你以垂直角度直视一个水池,你就可以通过表面的最小反射率看到下面的水。在一些特定的角度,你更有可能看到水上 方的情况,而不是下面的。所以,当我们给材质添加反射时我们也必须研究这些边缘效果,使得在面对摄像机时如何让其的法线方向少一些反射而在其边缘时多一些 反射。
镜面反射(相对于漫反射)-我们必须遵循对于玻璃来说的漫反射光谱。在大多数情况下,因为它是一个高密度的硬物,们需要给它一个低的漫反射值和较高的镜面反射值。然后我可以控制它的光泽度来决定这个玻璃杯是否是磨砂的。
折射率-最后,因为我们的玻璃是一种比周围空气密度大的介质,我们需要计算它的折射率。下面的图给出了提示。我们可以很快看到玻璃的IOR的值为 1.52(也有可能是1.5和1.55之间的值)。如下图的玻璃所示,它的正面是正常的,但是在它内部和后面的物体形状发生了改变,著名的例子可以看左边 的图,这就是所谓的“stick in the pond”。由苏格拉底第一次提出这个理论,秸秆是不是真正弯曲。而事实上我们的眼睛看到的是通过玻璃和其中的水两次弯曲后形成的图像。这一概念有一个名 字:电介质(稍后我们将使用电介质材质)。


Ok, so now that we have a handle on the physics that goes into this, we can make these materials. Let’s start out by trying to accomplish the look of true glass using a Maya Blinn. I will first make the colour and diffuse colour very dark so as not to influence the look of the glass at all. The transparency is set pretty high (although we will texture this in a few moments). The Eccentricity is low and the Specular Roll off is high, creating a highly specularized (less glossy) look. The reflectivity will be textured in a few moments as well (Fig.08). Note: I do not have the Reflected Colour Channel textured since I have actual objects surrounding this in the pint glass in the scene. If the glass was on its own, it would need an image to reflect, and we would place that here.
好了,我们现在掌握了物理上的一些原理,下面我们开始赋予材质。下面让我们尝试使用maya的布林材质来制作一 个真实的玻璃,首先,我会把颜色和漫反射调到很暗,以免影响玻璃的外观。将透明度设置的很高(尽管我们不久将赋予材质)。偏心率低一 些,“Specular Roll off”高一些,“specularized”很高(少一些光泽)。稍后将给反射率赋予材质。注:我没有给反射颜色通道赋予材质是因为我给了一个实物环绕 这个场景中的玻璃杯,如果场景中只有玻璃杯,那么我们就要给这个通道赋予一个图片用来表现反射了。

It looks so bad in Fig.09, mostly because of the lack of refractivity. So reflectivity is what we will establish next.
Ok, let’s get the refractivity working! (Fig.10)
看起来太差劲了。主要是缺乏对折射率的调节,接下来我们来进行这一步。
好的,让我们让折射率起作用。


It’s looking better now (Fig.11), but the glass is still too uniform in its thickness and reflectivity. Time to add some ramps to control this!
这样看起来好多了,但是玻璃的厚度和反射仍然太均匀,是时候添加一些渐变来控制了。

Thickness – let’s first add a ramp to control Transparency. We will control this ramp using Maya’s Sampler Info node. First I will create a ramp texture and link it to control the transparency of the glass. The ramp is black-to-white, as it only controls alpha information. Whiter is more transparent; blacker is more opaque (Fig.12).
厚度-让我们首先添加一个渐变控制透明度。我们将使用Maya的采样信息节点控制这个渐变。首先,我将创建一个渐变纹理并将其连接到玻璃的透明度上。渐变从黑到白,因此它仅控制Alpha信息,白色更加透明,越黑则越不透明。

This will (by default) apply the ramp directly to the UVs. However, since this is a V-Ramp (as seen in Fig.12), we can use the Sampler Info Utility’s facing ratio attribute to control this V-Coordinate. This will cause the ramp to be applied based on how much the normals of the glass face the camera. The top of the ramp will now represent where the object’s normals are facing the camera; the bottom will represent the angle which is facing 90 degrees away from the camera. We can then perform yet another render (Fig.13 – 14).
We’re getting there! Now let’s establish the reflectivity that comes with the Fresnel effect.
这将直接连接(默认)渐变到uvs上。这是一个v向的渐变,我们可以连接采样信息节点下的“facing ratio ”属性到渐变下的“V-Coordinate”下。这样会使渐变获知玻璃上有多少面的法线是面向摄像机的。渐变的顶部将表现出面向摄像机的玻璃的面,底部 则表现垂直于摄像机90度的面的效果,然后,我们再次进行渲染。
我们充满信心!现在让我们将依据菲涅尔效应建立反射率。


The Fresnel Effect – we need to establish another connection of ramps to the reflectivity channel. Also known as the “Bidirectional Reflectance Distribution Function”, our goal is to establish a ramp to correspond values of how reflective the object will be when we look at the mesh from a low angle, and correspondingly from a high angle. When established, the ramps should looks as shown in Fig.15.
菲涅耳效应-我们要建立一个渐变来连接到反射通道上。别称为“双向反射分布函数”,我们的目标是建立一个渐变得到一个相似的值来实现一个物体是如何反射的,不管是我们从一个低角度观察或是相对应的高角度。当建立好后,渐变应该如下图所示。

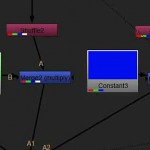
Our hypergraph network should look as shown in Fig.16 (note: I have re-used the sampler info node). Here is our render (Fig.17).
我们的超视图应如下所示(注意:我又使用了信息采样节点)。这里是我们的渲染结果。


Lastly, let’s add some blurring for a touch more realism. With Mental Ray we can subtly blur our reflections and refractions (Fig.18 – 19).
Done! We have now successfully created glass using a Blinn. Let’s now examine how Mental Ray can do this much more simply
最后,让我们添加一些模糊让其更真实,使用mentalray我们可以巧妙地模糊反射和折射。
完工!我们成功的使用布林实现了玻璃的效果。下面我们研究如何使用mentalray轻松的实现效果。


Creating Glass with a Dielectric Material:
创建玻璃使用电介质材质:
——————————————————————————–
I have now made a second pint glass and created a Mental Ray Dielectric Material to apply to it (Fig.20). The attribute editor only has a few choices; this is because all of that sampler info and ramp stuff that we had to do with the Blinn is already taken care of. The material’s attributes are a hard specular/reflective surface by default, and all we have to do is set the IOR value to that of glass. The IOR_out value is also crucially important and represents the value of the medium surrounding the glass (in this case air). A situation where this might need to be altered is when we are creating a material for water that is in a plastic water bottle. IOR would be set to 1.33 for water and the IOR_out would be set to 1.46 for the plastic surrounding it. Here we see a render as well (Fig.21 – 22).
我现在已经建立好了第二个杯子同时赋予了它mentalray的电介质材质。属性栏里只有个选项值;这是因为所 有的在布林中需要连接的材质它都已经处理好了。这个材质的默认属性是一个高强的镜面/反射面,我们全部要做的就是设置IOR值为玻璃的值就行了。 IOR_out值也极为重要,它代表着玻璃周围的物体的密度值(现在的环境下是空气)。因为当下我们的杯子中有水,所以我们要设置IOR为 1.33,IOR_out值为1.46。下面使我们渲染的结果。


So simple, you say! Well, it gets even simpler with Mental Ray’s new Mia_material, available in versions of Maya 8.5 and after!
太简单了,在maya8.5中使用mentalray的新材质Mia_material后它就变的更加简单了
Creating Glass with a MIA Material:
使用 MIA Material创建玻璃
——————————————————————————–
The Mia_material is a super awesome, physically accurate material that can simulate almost any type of surface. From Lambert or Oren-Nayer style diffuse surfaces, to metals, brushed metals, anisotropic, glass and gems, glossy metal, frosted materials, translucent surfaces – you name it. It has built in Ambient Occlusion, Final Gathering (per object basis), Fresnel reflectivity (BRDF), and metalicity. Plus, it comes with presets. Let’s use one now: create the Mia_material (Fig.23).
Mia_material是一个超酷的、物理精确的材质,它可以模拟几乎任何表面。从兰伯特或“Oren- Nayer style diffuse surfaces”,金属,金属拉丝,各向异性,玻璃,宝石,金属光泽,磨砂材料,半透明表面。它基于环境闭塞,最终聚会(每个对象的基础上),菲涅尔反 射(BRDF的),和metalicity。此外,它还带有预置效果。让我们现在创建Mia_material。

Choose the correct preset (you will notice there are many to choose from). Now render (Fig.24 – 25).
选择正确的预设(你会发现有许多可供选择)。现在渲染


We have now looked at 3 different ways to create realistic glass in materials in Maya. Here is one last look at the 3 glasses side by side by side (Fig.26).
现在我们已经研究了3种maya不同的方法来创建真实的玻璃材料。下面是三个杯子的最终效果。
")
您可以能还会喜欢这些内容:
 照片级别的食物制作
- MAYA里用插件输出VECTOR到后期制作运动模糊流程
- 写实老虎毛发特效制作arnold渲染流程
- maya渲染网格方法之一
- Maya Vray Sun and Sky lighting and rendering
- 制作小鱼
- 使用NUKE Maya和Photoshop完成HDR合成效果
- Retargeting the Animation 教学
- RGB Light Pass在maya和nuke中的工作流程
- Rendering in Layers in Maya
- 在maya中制作超人的头发的技巧
- Maya Vray Environment 环境体积雾效渲染
- 使用maya流体功能创建真实的龙卷风视频教学
- maya卡通科幻场景渲染视频教学


推荐相关中文教程
CARBON SCATTER FOR MAYA景观插件完全教学
本套教学是由MG录制。从CarbonScatter的每一个功能入手,让你从零基础开始熟悉并且掌握Carbon Scatter的使用技巧。写实女性角色制作全流程高级案例教程
本教程是超高质量的写实角色肖像制作完全流程,教程从基础模型搭建开始,演示了一个写实欧美女性的制作全流程,教程保留了所有技巧的关键节点,全面呈现制作这种写实类型角色的技巧和流程。希望制作写实角色肖像的用户将从中学习到大量的高级技巧。超写实角色《剑圣》全流程实战教学
本教学将带你进入超写实CG角色的世界,石磊老师通过一个剑圣的角色头部制作,教你完成照片级别角色的完整流程,从此,超写实CG角色不再高不可攀,你也可以做到!Yeti For Maya影视毛发制作完全教学
Yeti是一个基于节点技术的强大的毛发工具,并且配合Autodesk’s Maya?制作效率极其之高。是目前各大影视特效工具制作毛发类特效的不二首选。arnold for maya渲染器完全教学
Arnold渲染器是基于物理算法的电影级别渲染器,正在被越来越多的好莱坞电影公司以及工作是作为首席渲染器使用。与传统用于CG动画的Scanline(线扫描)渲染器(Renderman)不同,Aronld是照片真实,基于物理的光线追踪渲染器。


推荐课程


推荐教程

0回复三种不同的材质创建真实玻璃杯"