
本教学为翻译教学,转载请注明来自aboutcg.net,以及注明翻译者
原教学出自littleboxofideas网站,原始链接如下:
作者: Sneh Roy
翻译:Zivix (aboutcg.net)
请尊重互联网道德,转载请注明转载出处和翻译者,谢谢!
How To Create Vector Retro Circles And Convert Them To Photoshop Brushes
怎么样创建一个矢量质感笔刷并把它转化为ps笔刷

A few weeks ago I shared a free high resolution photoshop brush set with my readers. Today I am going to show you how to create that brush set in 5 easy steps. We will be using both Illustrator and Photoshop to create very high rsolution, clean vector images for the brush. We are going to make some scribbly retro circles.
Software : Adobe Illustrator CS4 & Adobe Photoshop CS4
几个礼拜之前,我分享了一个免费的高效的ps笔刷,今天我将要展示给你们的是怎么样通过5个简单步骤创建一个那样的笔刷。我们将使用到ai和ps。我们将要创建一些划线的动感圆圈。


Open a new document in Illustrator by going to File>New. Set Fill to red and Stroke to null. Choose the Ellipse Tool. Holding down the Shift key, click and drag to create a red circle in the work space. With the circle selected [Use Direct Selection Tool and click on the circle], go to Object>Transform>Transform Each. Set Scale to 75% as shown in the picture and click on “Copy”. This will create another red circle in the forefront, smaller than the first one. Click on this new circle and set Fill to yellow. Then clicking on this yellow circle, go to Object>Transform>Transform Each and repeat the process, finally setting Fill to a new color. Do this a couple of times till you get a few concentric circle. Then select all circles by going to Select>All. Group them together by going to Object>Group [or by clicking on the circles and pressing down Ctrl and choosing “Group” in the panel that opens].
打开ai,创建一个新文档,填充颜色是红,没有轮廓。选择椭圆形工具,按住shift按左键拖拽出一个红色的圆。确定圆被选中,对象面板,变换,变换每个,缩放75%,点击复制。这样就会得到一个同心红色圆,把这个新圆填充黄色,然后打开对象面板,重复刚才的操作,然后填充一个新颜色。然后选择所有圆,群组他们,通过点击对象面板,群组。


Create a new layer in the document by clicking on the “New Layers” tab at the bottom of the Layers Panel. Create a new concentric circles graphic by following the actions of Step 1. Experiment with the scaling percentage and colors to get a new kind of circle. Then create yet another layer and make a new set of concentric circles. Do this 4-5 times till you get a bunch of concentric circles as shown in the picture.
创建一个新图层,创建一个新的同心圆,然后填充些新的颜色。再创建一个新图层,再做一个同心圆。这样4、5次直到你得到了像下面图片中显示的效果。


Click on the first layer with the first set of circles you made. Go to Filter>Stylize>Scribbles. Set Scribble Options to as shown in the picture. You can experiment with your own settings for a different look. Apply this Filter to each of the layers and all the circles till they are all scribbly.
点击第一个图层,打开效果面板,风格化,涂写。按照截图数值设置。你可以尝试你自己的设置数值得到不同的效果。应用这个涂写给所有的圆直到他们都有了滤镜。


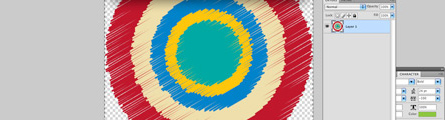
Make one layer visible and keep the rest hidden as shown in the picture. With one set of circles visible, save the illustrator file. Now go to Photoshop and open the illustrator file. Make sure you set the size very high, like 2500px width or higher. Go to Edit>Define Brush Preset. Name the brush as “retro_circle_scribble1″. Go back to the beginning of Step 4, this time making a new set of circles visible, saving the illustrator file and importing it in Photoshop. You then save another brush. Repeat this process till all the different set of circles are saved as brushes.
把其他层都隐藏,只留一个图层可见,就像图片中展示的一样。就这样保持一个圆的图层可见,然后保存为ai文件,现在打开ps,打开这个ai文件。你要保证设置很高的尺寸,比如高宽都是2500,去编辑面板,定义画笔预设,把笔刷命名为 “retro_circle_scribblel”然后回到ai,打开隐藏的圆形其中之一,储存为ai格式,在ps里打开,定义画笔,这样你有了另一个自定义笔刷。重复这个过程,直到都以笔刷的形式保存完成。


Step 5
Go to Edit>Preset Manager. With “Brushes” selected in the drop down, you will now see all the brushes currently loaded in your software, including the new retro circle brushes at the very bottom of the list. Pressing down on Shift, select all the retro circle brushes by clicking on them. Then click on “Save Set” and name your brushes as “retro_circle_scribbles.abr”, an abr file. Your high resolution brush set is now ready. You can stash it in your resource folder, give it away as a freebie or sell it as stock.
去编辑面板,预设管理器,这个时候底部已经选定笔刷,你可以看到现在所有的笔刷都已经导入到你的软件里了,包括在最底部的新的retro circle brushes。按住shift选中你的自定义笔刷,点击存储设置,把你的笔刷保存为abr格式。

Step 6
To get a brush that has a few different circle sets arranged in a collage, in Step 4 collect all your different graphics in one layer. This can be done in Illustrator by clicking the fly-out options tab in the right top corner of the Layers Panel. Choose “Collect Artwork In new Layer”. Once all your different sets of circles are in one layer, arrange them in a collage, overlapping or separated as you wish and then save the illustrator file. Then import that file in Photoshop like before and save it as a brush preset.
要制作不同的圆排列的一系列笔刷,参照在第四步把你所有的图形都放到一层里面,这可以在 Illustrator的层面板选择右上角下拉键头的菜单,选择”Collect Artwork In new Layer”(将所有内容合并到一个新层里面),这么做之后,将她们顺序排列,按照你的愿望互相交叠或者分开,然后保存Illustrator文件,然后就像前面说的那样导入Photoshop。并把它保存为笔刷设置。


推荐相关中文教程

电影MATTER PAINTING基础实战案例教学
马良老师将通过一个精美的实例,来教你如何使用Photoshop结合After Effects软件完成动态Matter Painting场景的制作,从而带你踏入专业MP行业的大门。构图绘画完全教学
本套课程的内容重点是学习绘画艺术的构图规律和方法。在绘画学习过程中,构图是一个重要的组成部分,学习它对于提高绘画练习和创作水平有显著的促进作用。特指纯艺和插画,海报。艺用人体解剖实用教学 下集 四肢篇
本套“四肢篇”教学是王九斤老师的《艺用人体解剖使用教学》系列教程中的下集部分,主要讲解了四肢的结构绘画要点,以及部分人体动态的基础讲解。艺用人体解剖实用教学 上集 躯干篇
本套“躯干篇”教学是王九斤老师的《艺用人体解剖使用教学》系列教程中的上集部分,主要讲解了躯干的结构绘画要点,以及部分人体动态的基础讲解。


推荐课程


推荐教程

0回复制作风格化的平面素材背景"