作者:Fabio Sasso
翻译:NONAL
Super Easy Neon Style in Photoshop
用超简单方法制作霓虹灯效果

This past Friday was the Abduzeedo meetup here in my hometown of Porto Alegre. It was really cool, we had a lot of fun and a lot of beers! When I was leaving I noticed the neon sign outside the pub and it really inspired me to create a tutorial on how to acheive that type of effect in Photoshop.
上周五在我老家偶遇了Abduzeedo。非常酷,我们很开心而且喝了很多的啤酒,当我要离开的时候我注意到pub外的霓虹灯标记,它激发了我用ps去做一个完成这种风格的教学。
In this tutorial I will show you how to create a nice light effect in Photoshop. We will use Layer Styles and Blend Modes to simulate a neon text effect.
在这个教学中我将演示个大家怎样用ps创建一个漂亮的灯光效果。我们将会用图层的混合模式叠加仿造出一种霓虹灯文字效果。
Step 1
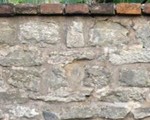
Open Photoshop and create a new document. I used 1920×1200 pixels. After that import a brick texture, the one I used was a courtesy of Shutterstock and you can download it here
打开ps创建一个新的文档。我创建的尺寸是1920*1200像素。下面导入一张砖块的图片素材。你可以在这里下载。

Step 2
With the texture layer selected go to Image>Adjustments>Hue and Saturation. Use 0 for the Hue, 45 for the Saturation and -85 for the Lightness.
确认材质涂层被选中,打开图像面板,调整, 色相对比度。色相值0,饱和度45,明度-85

Step 3
Add a new layer and go to Filter>Render>Clouds. Make sure you had black and white for the foreground and background colors. With the Eraser Tool (E) delete the areas close to the edge and leave just the center of the image. After that change the Blend Mode to Color Dodge.
添加一个新的图层然后打开滤镜、渲染、云彩。这之前要确定你的前景和背景色分别是黑色和白色。用橡皮擦工具擦除接近边缘的部分保留图片中间的部分,然后改变涂层的混合模式为color dodge。

Step 4
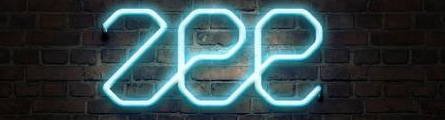
Import the logo you want to use for the neon effect. I’m using the ZEE logo I created a few weeks ago. Duplicate the layer and hide it because we will need to use a few copies later on in this tutorial. Select the visible logo layer and go to Filter>Blur>Gaussian Blur. Use 15 pixels for the Radius.
导入你想要制作成霓虹灯效果的标志,我用一个几星期前制作的ZEE标志。复制这个图层然后隐藏,因为我们在这个教学后面使用到一些副本。选中看见的标志图层,去滤镜面板,模糊,高斯模糊,半径值15.

Step 5
Follow the images below for the settings of the Layer Style. We will be using Drop Shadow, Inner Shadow, Outer Glow, Bevel and Emboss and Color Overlay.
依照下面的图片设置图层的风格。我们将要使用投影,内阴影,外发光,斜面和浮雕和颜色叠加。


Step 6
This will be the result you will get after the layer style.
这将是我们设置完成后的结果。
Step 7
Duplicate the layer with the layer styles to make the effect a bit stronger, but reduce the opacity to 50%.
复制这个图层,加强一点效果,但是把透明度降到50%。

Step 8
We will need another layer with the logo without any layer style applied to it. Put this new logo on top of the others and then go to Filter>Blur>Gaussian Blur. Use 100 pixels for the Radius. Also change the Blend Mode to Color Dodge.
我们需要另外一个没有经过任何处理的logo图层,把这个新的标志放在其他图层之上,然后去滤镜面板,模糊,高斯模糊。半径值设置为1000.然后也把图层叠加模式从blend mode改为color dodge。
Step 9
Now with the Brush Tool let’s create the base part of the neon that will be fixed on the wall. Use black for the color and put this behind the neon layers. After that go to Layer>Layer Style>Bevel and Emboss. Use the image below for the values of the Bevel and Emboss. For the “E” base use -160º for the angle and for the “Z” base use 0º.
现在我们要使用笔刷工具创建一个霓虹灯基本的要融合在墙上的部分。用黑色然后放在霓虹灯图层后面。这之后我们再去图层面板,图层样式,斜面与浮雕。用这个底层的图片为斜面与浮雕设置值。字母E用角度160 字母Z用零。

Step 10
Again with the Brush Tool (B) and a very soft brush, using 0 for the hardness, add a new layer behind the layers created in the previous step. So just paint a very soft shadow.
然后再用笔刷工具,选择边缘很柔和的笔刷,硬度为零,在一个其他图层之下的新图层完成。然后画一个非常柔和的阴影。
Conclusion
Light effects are always really cool for wallpapers, I’m really addicted to these types of effects and in this tutorial I showed you how to create a neon effect. Basically, the effect is all about layer styles and blend modes. Now, it’s up to you. You can try different colors and backgrounds but the technique won’t change that much from this one.
总结
用光效做墙纸效果通常都很酷,我真的非常喜欢这种效果的风格,而且很愿意在这个教学中教大家如何实现这种效果。基本上,这种效果都是靠图层之间的叠加。现在,是大家动手的时间了,你可以尝试一些不同的颜色和背景,方法和教学里讲的大致相同。
Click on the image for full preview
Click here to download the Photoshop file used for this tutorial


推荐相关中文教程

电影MATTER PAINTING基础实战案例教学
马良老师将通过一个精美的实例,来教你如何使用Photoshop结合After Effects软件完成动态Matter Painting场景的制作,从而带你踏入专业MP行业的大门。构图绘画完全教学
本套课程的内容重点是学习绘画艺术的构图规律和方法。在绘画学习过程中,构图是一个重要的组成部分,学习它对于提高绘画练习和创作水平有显著的促进作用。特指纯艺和插画,海报。艺用人体解剖实用教学 下集 四肢篇
本套“四肢篇”教学是王九斤老师的《艺用人体解剖使用教学》系列教程中的下集部分,主要讲解了四肢的结构绘画要点,以及部分人体动态的基础讲解。艺用人体解剖实用教学 上集 躯干篇
本套“躯干篇”教学是王九斤老师的《艺用人体解剖使用教学》系列教程中的上集部分,主要讲解了躯干的结构绘画要点,以及部分人体动态的基础讲解。


推荐课程


推荐教程

第5步的时候,是不是有截图搞错了,出不来效果呀?