翻译:levege(本站翻译小组成员)
im trying to create some xGen hair and share what i came up with…
这次的教程我们尝试一下创建xGen毛发以及分享一些我想到的东西。
xGen is a complicated beast… so if someone knows an other solution please jump in…
xGen真的非常复杂,如果有人知道其他的解决方案,请不吝赐教。
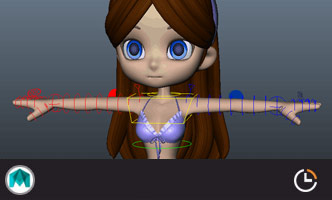
im starting with the eye brows…
我们先从眉毛开始,
first you have to set a project…
因为xGen的数据都是要储存到工程目录里的,所以首先必须要设置好工程。
cause xGen stores all the data into your project folder…
select the groom object…
选择要创建毛发的物体
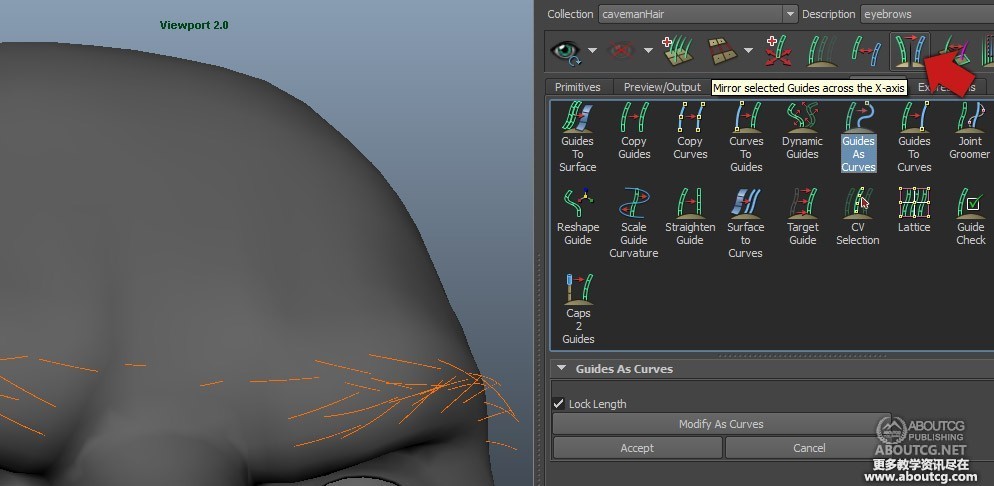
create a new xGen description for long hair… and i like to place guides..
创建一个新的xGen description,造型控制方式我比较喜欢用“Placing and shaping Guides”(放置和调整引导线)。

next is started to place guides…
下面开始放置引导线
rotate and scaled them…
引导线可以通过旋转和缩放进行调整

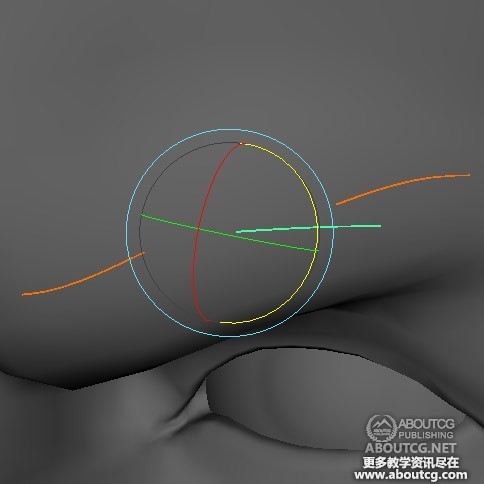
after that i used the Guides As Curve tool to bend them in place…
做好以后使用Guides As Curve工具将其弯曲

if you have created some guides xGen will start to interpolate new splines…
如果你已经创建好了一些引导线,xGen将他们转化成样条曲线
best is to create some rough splines and let xGen do the inbetweens and adjust them to your liking…
推荐大家将样条线粗略调整一下,然后让xGen做一些差值和调整将他们做成你想要的样子。
select the splines on one side of the axis and mirror them over…
选择一侧的样条曲线,使用镜像工具将其镜像到另外一边
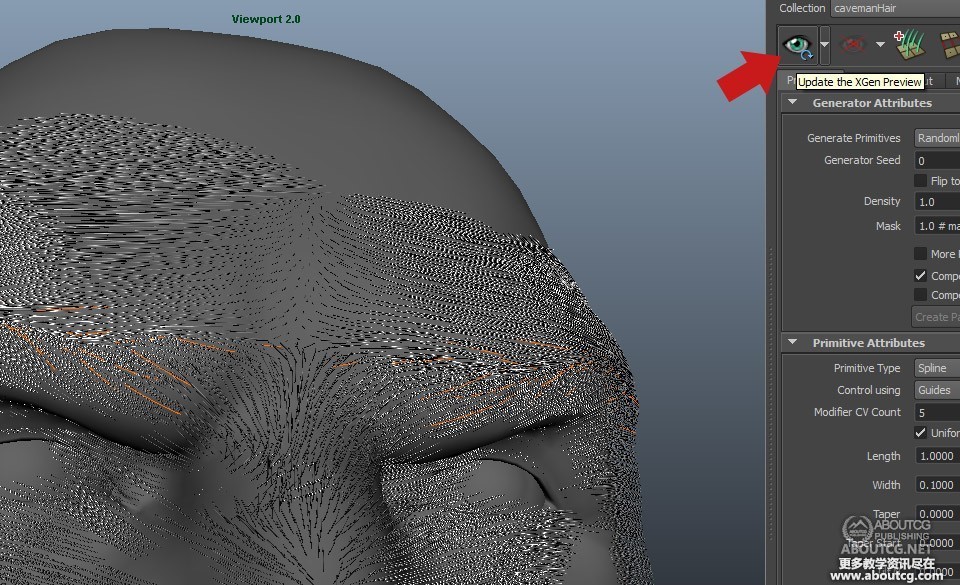
now the first preview isnt looking great…
现在的预览看起来并不是太好
as you can see xgen isnt creating hair for the whole head…
可以看到xGen并没有为整个头部创建毛发,而是仅仅在引导线附近生成了毛发
just around the guides…
so i turned off tube shading…
我关掉了tube shading

and played with the shader…
搞了一下shader

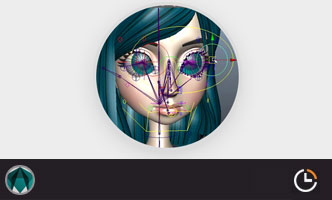
now i like to paint some density…
接下来我们通过绘制一个遮罩来控制密度
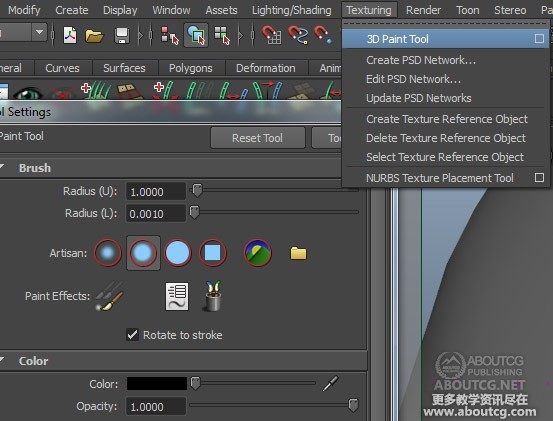
and cause xGen is ptex based but the 3dpaint tool in maya is using uvs for painting i used a little trick to get new “ptex conform” uvs…
if you have an object with no uvs the 3dpaint tool will create new ones optimzed for ptex baking…
由于xGen是基于Ptex的,但是maya的3Dpaint工具是使用UV来绘制的。这里我用了一个小窍门来得到一个新的符合Ptex的UV:
create a new uvset and copy it over to map1… all uvs are gone…
创建一个新的uvSet,把他拷贝到map1,所有的UV就都消失了,然后删除新建的这个uvSet
delete the uvSet…

to start painting just click create map…
点击”Create Map“开始绘制遮罩.

to get the 3Dpaint settings use the option box under the texture menue…
在rendering模块中,点击Texturing目录下面的3D Paint Tool后面的方块打开3D Paint工具的设置窗口。
maybe you have to switch the status line to rendering…
so save the map use the disc icon…
点击下图的磁盘图标保存当前绘制,
or the brush icon to start painting again…
旁边的小刷子按钮切换回绘画状态

now you sould get something more pleasing…
经过之前的操作我们的毛发应该变得美观一点了
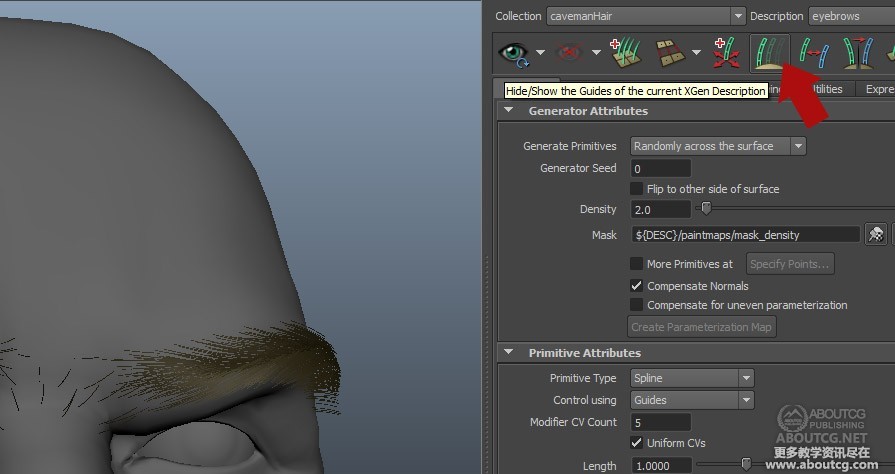
to hide the guides use the hide icon…
点击隐藏按钮隐藏掉引导线
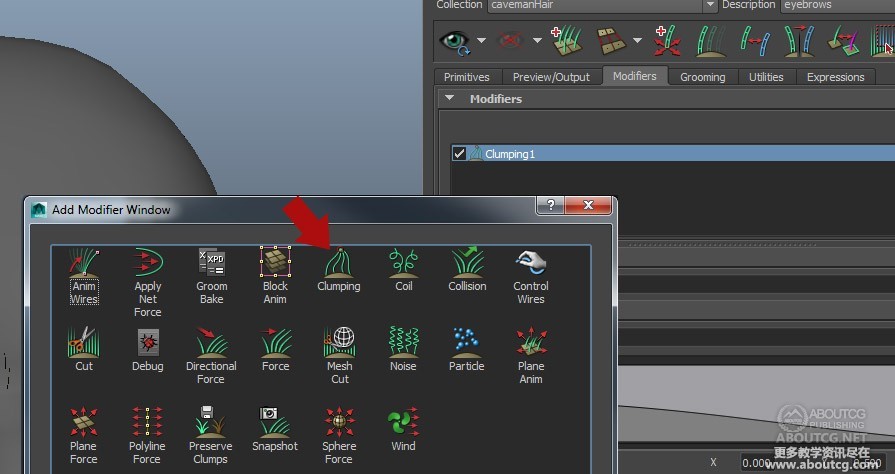
now we are using some modifiers to get more life into the hair…
现在我们用一些修改工具来让我们的毛发更加生动
go to the modifier tab and create a clumping modifier..
在Modifiers面板下面创建一个Clumping 修改器
now we have to setup some ptex maps…
下面我们要设置Ptex贴图
generate clump map with a decent size… in my case 0.2
在弹出的窗口中点击generate按钮来生成丛块贴图,Density值大家根据自己的情况来设置,本例中为0.2.
save it…
点击保存

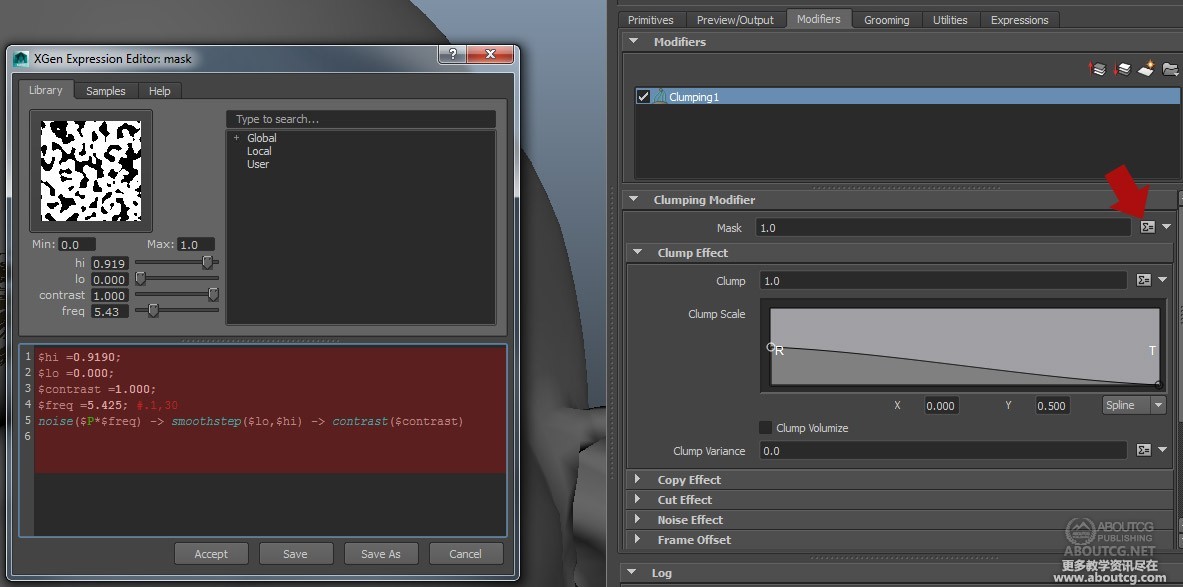
next “i” created an expression to get some noise into my clumping…
big thanks to Tom and Tarkan..!
接下来”我“创建了一个表达式来为刚刚创建的丛块增加了一些噪点
其实这里要特别感谢一下Tom 和 Tarkan !
its based on seExpression wich is creating all those slider on the fly…
这个基于seExpression的表达式创建了一些可以调节的滑块
type in the first line and you get a slider from 0-1 named hi…
比如输入第一行,你就可以得到一个名为hi的值为0-1的滑块。
下面是完整的表达式:
$hi =0.9190;
$lo =0.0000;
$contrast =1.0000;
$freq =10.340; #.1,30
noise($P*$freq) -> smoothstep($lo,$hi) -> contrast($contrast)
if the noise doesnt show up in the preview window just move those sliders…
如果预览图中不显示噪点的话,移动这些滑块来调节一下就可以了
now the second clup modifier….
下面创建第二个Clump修改器
set a higher density than the first one…
这个的Density值要比第一个高一点
cause this one will use the ptex map from the first one…
因为这一个修改器要使用第一个的Ptex贴图
xGen is using a modifier stack to get everything working…
xGen的修改器运行模式是堆栈式的。
i will show the maps in the next post…
在接下来我将向大家展示这些贴图

here you can se the two ptex clump maps…
这里你可以看到两张Ptex丛块贴图
the second one is based on the first one…
由于第二张是基于第一张的
so if you change the settings in the clump01 modifier you also have to rebake the clump02…
所以如果更改了Clump01的设置,也要重新烘焙Clump02
i remember there was a little trick to let xGen generate those maps every time…
我记得有个小窍门可以让xGen自动生成所有的贴图来着
if i find them i repost it here…
等我找到了我再把这个方法贴出来……

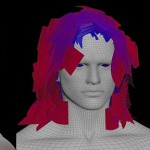
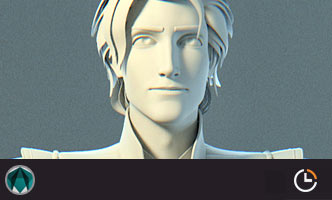
now im ready to render a first draft…
现在我准备渲染一个预览来看看了
hmm… not so good…
呃……好像不是很好…

after hitting Auto Set for the Primitve Bound everything looked fine…
点了一下Primitve Bound后面的Auto Set按钮以后看起来好多了
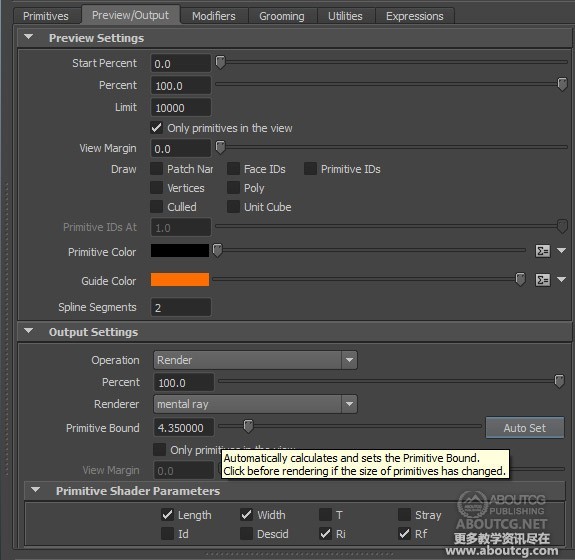
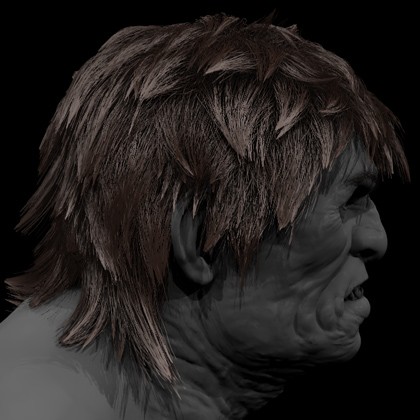
not so bad for the first try…
对于第一次尝试来说还不错
ok the second one… :d
好的来第二个:D

the rendering with mental ray is working fine so far…
到目前为止,使用mental ray渲染都很好,
but what if i like to render with an other render solution…
但是如果我想用其他的渲染器来做怎么办呢…
there is no solution to render with vray, or arnold at the moment…
but they are workin on them…
不幸的是现在Vray和Arnold都没得用,不过他们已经在开发中了。(Arnold RC1 已经部分支持了。)
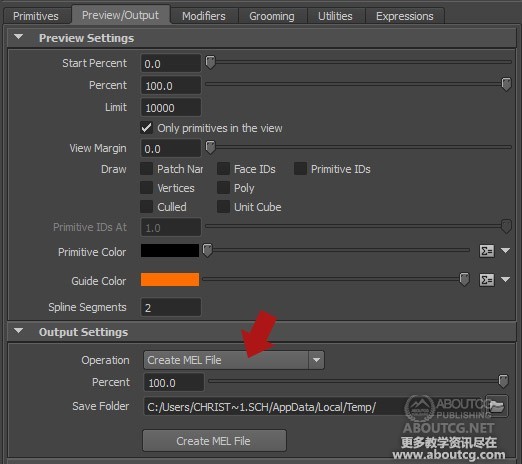
there is a little trick to get something working with standard maya hair…
这里有一个小窍门可以得到一些maya的标准毛发系统用得上的东西:
you could export a mel file with all hairs as splines and use them as folicle for maya hair…
可以将所有的毛发作为样条曲线导出一个mel文件,并将他们用作maya毛发系统里面的毛囊。
just export a mel file…
只要导出一个mel文件就好了。
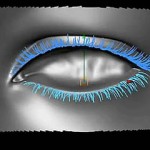
same workflow for the hair…
头发的流程跟前面是一样的

text i will try a long hair verison with tube groom…
下面我将用tube groom来做一个长发版本
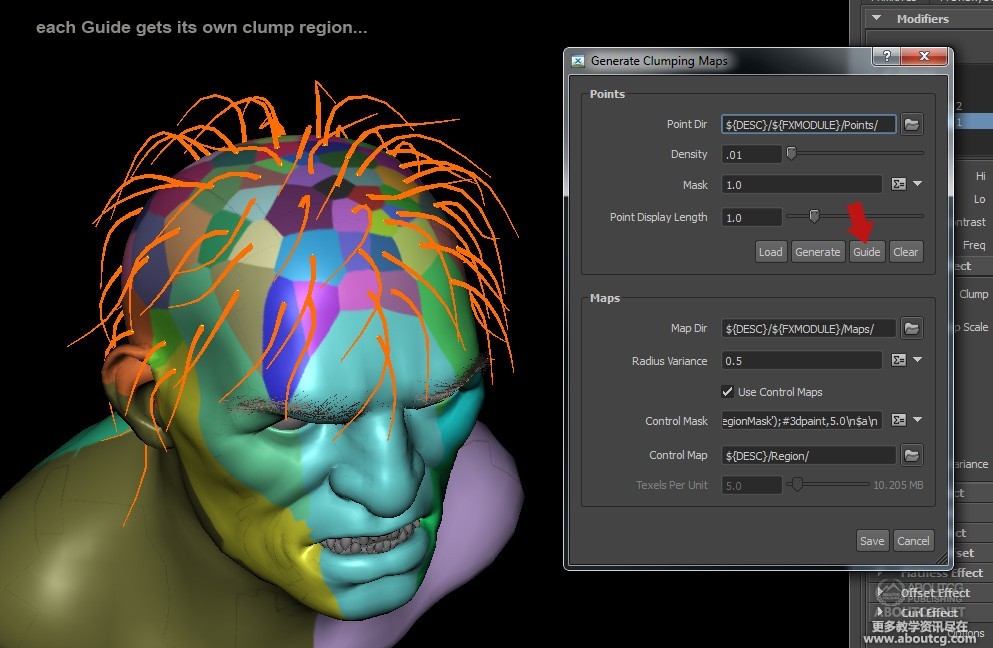
some more test with clumping for each Guide….
生成丛块的时候,点击Guide按钮会让丛块基于每根引导线
still a lot to do…
还有很多事要做……
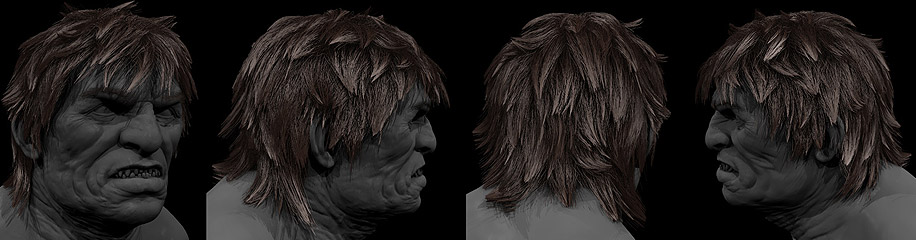
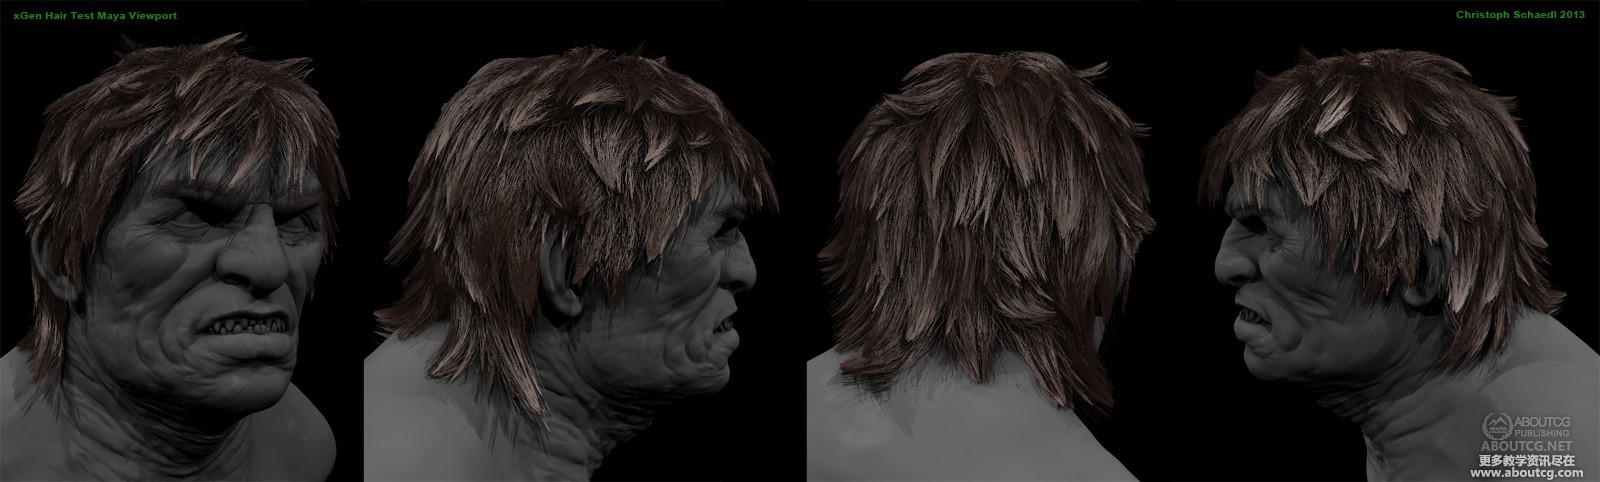
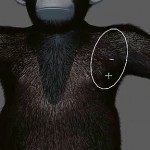
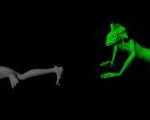
current status in maya Viewport…
从Viewport中看到的当前效果
您可以能还会喜欢这些内容:
 使用多边形控制毛发工具GMH2 Hair Script演示
- 写实老虎毛发特效制作arnold渲染流程
- 配合引导曲线在maya的nHair中制作男性发型教程
- 如何在maya中从物体造型到毛发生成
- 第一版maya教学:Fur基础
- 使用houdini Hair grooming创建游戏和特效的毛发
- 在maya中制作睫毛和眉毛的教程特辑
- 在maya中制作游戏使用的毛发效果教程
- 使用maya制作纤维生长动画教程
- Dexter Studios 数字人物和动物毛发制作演示
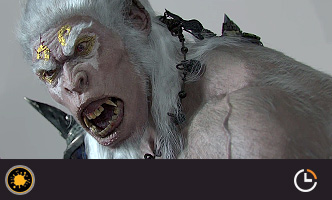
- 使用maya XGen制作猩猩毛发教程
- 使用arnold 渲染器在maya2017中渲染写实的毛发教程
- 在maya中制作超人的头发的技巧
- Retargeting the Animation 教学


推荐相关中文教程
《大猿王传》电影级别动画短片系列教学第二部:大猿王贴图篇
学完本套教学以后将能够理解自然界物体贴图的规律,不再局限于照片贴图的投射方式画贴图,能够高效率的完成大分辨率超多UV象限的UDIM模式贴图的绘制,制作出真正电影级别的贴图并且够理解Liner线性工作流程的原理,在工作流程灵活高效的完成贴图以及渲染工作。Maya绑定技术精解教程机器人绑定完全教学
本套教学还会讲解在绑定中如何结合python,大大提高绑定效率,与人物不同,机械类的绑定往往需要联动的效果,并且四足的设置也与人物不同,需要结合多套IK的特性和设置达到最终效果Maya绑定技术精解教程进阶篇角色身体绑定
本套教学基于初级人物绑定基础上增加了IKFK拉伸,肘部锁定,IKFK共存,无缝切换等大家迫切想要了解的知识,并结合作者经验,让大家快速掌握这些非常有用的技能。Maya高精度建模全案例实战教程进阶篇
本教程是maya影视建模的实战教程,作者教授了多年的影视模型制作工作经验。使用maya的建模工具完成武器,场景,道具,角色等高精度的多边形模型的建模。这类模型的制作能力在影视制作,游戏制作中,都是必备的。也是所有CG从业者的必须技能。写实女性角色制作全流程高级案例教程
本教程是超高质量的写实角色肖像制作完全流程,教程从基础模型搭建开始,演示了一个写实欧美女性的制作全流程,教程保留了所有技巧的关键节点,全面呈现制作这种写实类型角色的技巧和流程。希望制作写实角色肖像的用户将从中学习到大量的高级技巧。超写实角色《剑圣》全流程实战教学
本教学将带你进入超写实CG角色的世界,石磊老师通过一个剑圣的角色头部制作,教你完成照片级别角色的完整流程,从此,超写实CG角色不再高不可攀,你也可以做到!Maya绑定技术精解教程 中级篇 角色表情绑定
本套教学将带进入绑定的进阶领域,通过实例从零开始,使你掌握表情绑定的全套技术,如果你想在绑定领域成为专业工作者,那本教学绝对不容错过。Maya零基础入门及建模实战中文教学
本套教学通过软件讲解和实际案例相结合,带领大家快速学习和掌握maya的基础操作,多边形建模和uv编辑,为后续的学习打下较好的基础。

推荐课程


推荐教程

到UV 那里就不明白了
这个插件是不是集成在maya2014里面的,有提供maya2012或者2013的版本吗?
2014有。
我也喜欢玩战锤。。。
酷!!!