翻译教程 原帖地址:
http://www.free3dtutorials.com/textu…res.php?page=1
“Making of seamless textures ” by Wojtek “Buddy” Starak
制作无接缝图层
Hi! This is my first tutorial, especially here on 3dtutorials.sk!
I want to show here my technique for making seamless textures for games, also how to create normal and specular maps. To not waste too much time on talkin I’ll start explaining asap. I’m using Photoshop 7.0, so tutorial is mostly for PS users but other applications offer really simmilar tools.
我想在这里表现我用于游戏的制作无缝图层的技巧,同样介绍怎么创造normal 和specular maps。为不浪费太多时间我现在开始解说。我使用PS7.0,所以本指南适用于大部分PS使用者以及其他其他非常相近的工具软件。
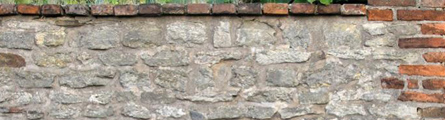
So, first, we need a good photo reference. I used this one straight from www.environment-textures.com
首先,我需要一个好的照片参考。我使用的参考图直接来源于www.environment-textures.com

Original size was: 2421x1565px I resized it to: 1200×776.
原始大小:2421x1565px,我调整为1200×776
We need to pick a part of the photo we want to use as a texture, but first we need to select “Rectangular Marquee Tool“
我们需要精选照片的一部分作为一个图层,但是首先我们需要选择“矩形选取工具”

set style to fixed size and set it to 512 px / 512 px
固定画框被固定大小并且固定它为512 px / 512 px

this is the size of the texture we gonna use”, “px” is important here, if we just type 512 selection will be 512 centimeters instead of pixels. Now just click on the photo and move around square marquee, find a good spot to use as center of texture but make sure there’ll be some margins on atleast on vertical and horizontal side of photo, to later use it to fix “seams”. Also try avoiding spots on the texture which are very characteristic, like the yellow stone on that wall, I leaved it in the selection to show later how to fix this.
我们将要用这个大小的图层,“px”在这里很重要,如果我们只是输入512,那将是512厘米而不是512像素。现在只是在点击照片并拖拽正方形选取框,选取一个精彩的污点用于图层的中心.但需要确定有一些空白在照片的四条边上,便于稍后用于修理“接缝”。同样在图层上尝试消除那些非常典型的污点,如同黄色的石头在墙上一样,我留下它在选取框里并在后面说明怎么样修理它。

Ok, when photo spot is found, just click “Ctrl+C” or select Edit->Copy. After this, create new document which will be automaticly in size of copied selection (512x512px), now paste it on the document. (Ctrl+V or Edit->Paste).
在照片的污点被选好之后,只要点击“Ctrl+C”或选取编辑-〉复制。在这之后,创建一个新的文件PS会自动把图形大小定为512x512px的文件,现在粘贴它到这个文件上。
Now we need to come back to the photo reference we used, and delete (delete button ) this 512×512 selection. When that’s done, we have to, in order to get rid of ugly seams, copy one vertical and horizontal piece of the ref. But before that, we should set “Guide Lines” to help algining “Rectangular Marquee Tool“(this time with normal style) while selecting those margins.
现在我们需要回到我们使用过的照片参考,并且删除(删除按钮)这个512*512的挑选品。在这些做好后,为了除去丑陋的接缝,复制一个垂直及水平的剪裁结合条。但是在这之前,我们需要设置“指导路线”以帮助“矩形选取框工具”(本次用普通模式)知道挑选出这些页边的空白。
To setup guides: You need to enable “Rulers” (white bars on left and top side of workspace, “Rulers” button is located View Tab). Also to enable Algin/Snap to the Guide Lines, You need to turn on “Snap” located in View tab, make sure that all options in “Snap To” submenu are on. To set the actual guidelines, (lines that help define proportions, use to snap/algin other objects, define exacly distance in cm, meters, pixels and so on.) You just need to drag them out from the white bars on top/left of the workspace, move them to the edges of deleted 512×512 selection, they will align automaticaly!
对于设置向导:你需要授权“标尺”(工作区左顶部的白色工具条,“标尺”位于视图菜单)。同样授权Algin/Snap以引导线路,你需要开启 “Snap”它位于观察菜单,确定“Snap To”子菜单的所有选项为打开。设置实际的指导路线,(划线以帮助定义平衡,使用snap/algin其它的对象,使用厘米、米、像素等等定义距离)你只需要拖拉它们出去工作区左顶部的白色工具条,移动它们到被删除的512*512被选物的边缘,它们将自动粘合在一起。

(译者曰:直接矩形选区工具 样式选择固定大小 框选出你想要的区域 然后视图菜单里面的 标尺 对齐 对齐到??全部勾上就好.然后直接拉出参考线 会自动对齐到你选择的区域 注:不要取消选择矩形选取区域)

Now we can finally get rid of ugly seams mentioned above, create a selection with marquee tool on the top of deleted piece of ref, hit Ctrl+C and paste it on our 512×512 texture, drag it to bottom. Be sure You’ve selected new layer “Later 1”, choose Eraser tool and try to remove most of the top side of the copied margin, play around with opacity/flow values, it’ll help you define smooth blends if needed.
现在你能够最终除去前面提到的丑陋的接缝,使用在顶部的选取框工具为删除接缝创建一个选框,点击Ctrl+C并且粘贴他到我们的512*512图层上,拖拉它到底部。注意你要选择一个新的图层“Later1”,选择橡皮工具并且尝试去消除大部分被拷贝的四周,设置不透明性/流量,它将帮助你编辑光滑的混合,如果需要。
![]()
Do the same with vertical side but now drag the selection from right on the ref to left on the 512 document.
垂直边按同样的方法做,现在拖拉被选物从裁判的右边到512文件的左边。
If everything went well You should end up with something simmilar to this:
如果所有都做好你应该以一些相似的而结束这些:

Note: You can use Ctrl+E to merge layers.
可用Ctrl+E来合并图层
To check if texture tiles perfectly create a new document in 1024×1024 size and paste 4 times whole finished 512 texture. If option snap is enabled they will algin to themselfs and edges of image. Should look like this:
检查图层板是否完美的创建了一个新的1024*1024的文件并且粘贴4次整个完成的512图层。如果snap选项是激活的它们将自己胶合以及图片的边缘。应该看起来像这样:

Looks good so far, I mentioned something about characteristic spots on the texture, which You can easly notice when they tile, in this one that “characteristic spot” is the yellow stone, to get rid of that color diference, create a new layer, select brush tool
目前看起来不错,我提醒过一些关于图层上的特有的污点,那些当它们成片时你能很容易注意到的,在这里“特有的污点”是黄色的石头,去消除这个颜色的差异,创建一个新的图层,选择刷子工具

to pick a color from image hold “Alt” and click place where You want to pic color from, I took color from one of the stones. Now paint over the yellow stone, use softbrush for that (right click on workspace, select one of the soft brushes, you can define size of it on top of the menu)
采集图片上的颜色,按住“ALT”并且点击你想要选取颜色的地方,我从其中一个石头上取得颜色。现在涂刷整个黄色石头,使用软刷去做这些(正确的在工作面上点击,选择软刷中的一个,你可以在菜单的顶部定义它的尺寸)

when You finish, change layer blending mode to “Color” (notice little Otacon helping me with work ).
当你完成的时候,转换图层合并模式到“颜色”

Tada! Stone have changed color, but it’s far from perfect, choose few diffrent colors and add some little details. What I ended with:
万岁!石头变色了,但它离完美还很远,选择新的不同的颜色并且增加一些细节。这是我完成的:

When you put it again on 1024 texture you’ll notice it looks far better. We can say that the texture is finsihed, all we need now are normal and specular maps. First save your new homemade texture into .tga file. There is several methods for making normal maps, I’m going to show an easy method, for this we’ll need Nvidia normal map plugin, install it and open your tga. In order to create normal map we need to desaturate image, Image->Adjustments->Desaturate. To create a basic normal map from it, click Filter->Nvidia Tools->Normalmap filter. Set it like this:
当你在一次把它放到1024图层上的时候你将注意到它看起来好了很多。我们能够认为这个图层完成了,所有我们现在需要的是标准的和镜像的图。首先保存你新自制的图层到.tga文件格式。这里有几个方法去制造normal map,我在这里展现一个简单的方法,在这里我需要Nvidia normal map插件,安装它并且打开你的tga文件。为了去创建一个normal map我们需要去降低图片的饱和度,图片-调节-不饱和度。用它创建一个基本的normal map,点击文件-Nvidia工具-normal map文件。设置它如下:

It’s simpliest normalmap you can create, here’s picture with them rendered on our texture.
这是你能创建的最简单的标准图,在这里图片连同它们着色到我们的图层上。

It doesn’t look to good, we need to tweak it a little. Paint over desaturated image using black (deeper parts) and white colors (stuff sticking out), they simply define heights on the texture. Should end with something simmilar:
它看起来并不好,我们需要调节它一点点。使用黑色(较深部分)和白色(素材伸出)涂刷整个不饱和图片,他们简单的定义图层的高度。应该用一些相似的结束。

Now create normalmaps again (Filter->Nvidia Tools->Normalmap filter). Use scales to define how much “deep” we want texture to be. Set it to 0 and 3. Looks far better!
现在再次创建Normalmap(文件-Nvidia工具-Normalmap文件)。使用比例尺定义图层我们需要多少深度。设置它到0和3。看起来好多了。

We want also a specular map which will define where should the texture “shine”, same as for normal map, desaturate image. (white – more spec, black – less spec) If we’ll use just desaturated map it will end looking like this:
我们同样需要一个specular map在那些将定义图层“发光”的地方,有一些如同normal map、不饱和图片一样的处理。(白色-较多的地方,黑色-较少的地方)如果我们将仅仅使用不饱和图它将在最后看起来像这样:

In order to fix this, we need first to change brightness&contrast of image, Image->Adjustments->Brightness/Contrast. Tune up Contrast and Tune down Brightness. It will result in only few parts of the texture shine, like the stone should. Result:
为了修理它,我们需要首先转换图片的亮度和对比度,图片-调整-亮度/对比度。调高对比度并且调低亮度。它将导致图层的仅仅一些部分发光,如同石头一样。结果:

When rendered ingame it will look far better.
在游戏里着色的时候它将看起来更好。
Whole texture is done all that can be done are small fixes on corners of the texture but on this one it wasn’t needed and even if, after passing this tut You should know how to do that , great job if you passed through this tut! I hope it helped out.
整个图层所有都被完成,能够完成图层角落的一些小的修改,但是在这里它不是必须的,在通过上诉所说之后你应该知道怎样去做它。


推荐相关中文教程

《大猿王传》电影级别动画短片系列教学第二部:大猿王贴图篇
学完本套教学以后将能够理解自然界物体贴图的规律,不再局限于照片贴图的投射方式画贴图,能够高效率的完成大分辨率超多UV象限的UDIM模式贴图的绘制,制作出真正电影级别的贴图并且够理解Liner线性工作流程的原理,在工作流程灵活高效的完成贴图以及渲染工作。电影MATTER PAINTING基础实战案例教学
马良老师将通过一个精美的实例,来教你如何使用Photoshop结合After Effects软件完成动态Matter Painting场景的制作,从而带你踏入专业MP行业的大门。Quixel Suite次时代贴图流程升级教学
在NDO和DDO之后,Quixel开发了新的Quixel SUITE插件,将NDO,DDO和浏览器软件3DO整合在一起,并且改变了贴图纹理的生成方式,不再以Photoshop的纹理生成效果,而是转由经过扫描的物理材质纹理库来生成材质,使得画面更加真实MARI影视贴图完全中文视频手册
The Foundry MARI是一款可以绘制超高精度贴图的绘制软件,最早源于Weta Digital公司为了制作《阿凡达》而开发的程序,后由The Foundry继续开发成为了现在大家看到的商业软件,快速又简单易用。Substance Painter 贴图绘画系统完全教学
我们的这套教学就是从一个个鲜活的案例入手,让你从零基础开始熟悉并且掌握 Substance Painter 的全流程,不论你是Maya,Max亦或者是Zbrush的用户 ,在这里都会找到如同Photoshop般的友善操作舒适性,直接在模型上绘制出各种物理属性,就像镀铬金属,锈蚀污浊的墙壁,嫩滑的皮肤,从多个案例中让你掌握这套简便快捷的材质制作流程。构图绘画完全教学
本套课程的内容重点是学习绘画艺术的构图规律和方法。在绘画学习过程中,构图是一个重要的组成部分,学习它对于提高绘画练习和创作水平有显著的促进作用。特指纯艺和插画,海报。Quixel NDO DDO次时代贴图流程完全视频教学
本套NDO DDO完全流程教学,通过由浅入深地多个案例,分别介绍了NDO,DDO的工作原理以及流程。Substance Designer贴图材质系统完全教学
本套Substance Designer教材是由AboutCG陶仁贤历经三个月的潜心研究,录制完成。从Substance Designer在游戏行业的流程入手,逐一介绍产品特点,界面,以及内置的200多个节点的原理和结构。并通过多个实例教材为您展示从零开始制作贴图,Substance Designer与Maya Anrold渲染引擎的互动,Substance Designer与Max互动、Substance Designer与Unity 3D引擎互动、Substance Designer与UnrealEngine3/UDK互动。


推荐课程


推荐教程

0回复如何制作无接缝图层"